Friday, October 15, 2010

Homemade Spray Cleaner


I've been making my own spray cleaner for almost 2 years now.  That's how well it works.  So, let's K.I.S.S. (keep it simple, sweethearts!)  Here it is:

1/2 tsp. biodegradable dish soap
1-2 tsp. borax
4-5 drops each: lavender, citronella, geranium, rosemary
fill with HOT water

The lavender is an antibacterial.  Rosemary is anti-parasitic, anti-bacterial, and anti-viral.  Citronella is antiseptic, bactericidal, insecticide, and deodorant.  Geranium is anti-viral, anti-bacterial, and anti-bacterial.  The borax is an excellent cleaning agent.  The dish soap cuts grease.  And, the HOT water disolves the borax.  Put it all in your spray bottle and shake it good for a minute or two.  Happy Cleaning, Ladies!  ;)


Tuesday, September 14, 2010

Basket for a Friend...

A lovely basket made for a friend, with items from around the house...
This basket includes (clockwise:) 
Basket!  Carefully held together with scrap fabric and a lovely hindi ribbon.
An herb bouquet from the garden- Orange Cosmos, Lemon Balm, Basil, Rosemary, Pineapple Mint, Fuzzy Mint.
Some watermelon seeds, romaine seeds *packaged, basil seeds still in the pod.
Dried chilies, a jar of dried basil, a 1/2 galon freshly picked Muscadines *a southern grape.
In the center are a quartz point soap & a lovely zipper flower, both made by myself.
Also included a Mary Jane's Farmgirl Sticker, as well as the farmgirl card..
Happy basketing!

Tuesday, August 31, 2010

Gemstone Soaps

So, the cute little ones are formed in an ice tray (found at Harps grocery for $1!) with an organic oils melt & pour soap, found @ The Chemistry Store.  M&P soaps are so fun and easy!  Just like the name, you simply melt and pour.  As for the larger gem molds, you have 2 options: 1. Make your own from appropriately sized gems and silicone molds, found here @ Make Your Own Molds.  2. You can purchase them premade from Renascent College or Flexible Molds.  I'm sure there are a few others out there with premade gemstone molds.  I searched for 'quartz point soap molds' or 'gemstone soap molds.'

For the shine, I use micha flakes, found at soap supply stores, as well as the skin safe color.  I scent them with my own essential oils. 

These make great gifts and party favors.  My designs have really evolved since these photos were taken, so next time I make them I'll put up a full tutorial with some new pics.

For inspiration I visit Etsy's Gemstone Soap Search.

Happy Soaping!

Monday, August 30, 2010

Wee Folk Art Giveaway!

One of our favorite craft sites is having a fantastic giveaway!  They are crafting up some rainbow lavender 'bean' bags and are giving away a set.  You can check out their site and the giveaway here:
Wee Folk Art Giveaway.

Happy Crafting everyone.

<3

Sunday, August 22, 2010

Blowtorch Crayons, for the Kiddies!!


Ok, I know I sound crazy. ;) It's all in good fun. I found some fun ice cube trays at Hobby Lobby just in time for Shep's 1st Birthday party. Since the trays can't be put in the oven, we'll melt them with a hand held blow torch and make some kiddy crayons. Fun for everyone!

Grab your trusty lil' blow torch, a set of pliers, some goggles, gloves if you prefer, a big box of crayons and a fun tray of any kind.


Carefully hold the torch some distance from the crayon. Let it drip directly into your mold.  Be sure to hold it far enough away from your mold, so that it doesn't become too hot.  Unless it's oven save, it's possible to melt them.


Let them cool between colors for layered looks or continue for more blended looks.  Choose complimenting color combination, or just go wild..

Add a contrasting layer to the back side, just for fun.

And, viola! Cute lil chunky crayons, for the kiddos.


Tuesday, July 6, 2010

Festive Banner Tutorial

Well, I can hardly believe it.. Shep is turning ONE! How fast they grow... *tear*   
Anyhoo, I'll get right to it. I've made him a festive banner for decorating the house for his {multiple} parties.
I Stumbled Upon this wonderful tutorial @ stitch.rip.repeat.  I then created my own using the following.

1/4 yard, of two fancy polka dotted fabrics, on sale at The Quilting Bee. {Very nice place.}  I added that to my 1/2 yard solid fabric. I grabbed 5 yards of a 1 1/2" silken ribbon from Hobby Lobby.


I drew out a triangle, first by marking 6" across the top. I then marked the center point and drew 8 1/2" down. Then went out the edges of the 6" and met up with the point at the bottom for a perfect triangle. I then cut out 11 solid, and 5 each of the polka dots, with my pinking blade on the rotary cutter.


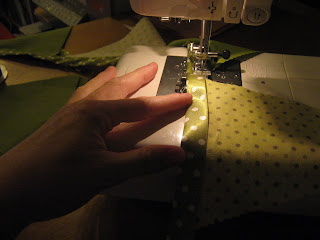
Next, I fold the ribbon in half and iron.  And now, begin sewing!  [My favorite part.]  I sew about 1 1/2 feet of ribbon for tying space.  I gave them about a 1/2" space between each flag.  I didn't bother pinning, as these are easy to line up with the fold of the ribbon as you're sewing.


And viola!  You've got a fancy, festive, *reusable*, cusotom made banner for all your celebrations!

ENJOY!